
installation
Download the Installer: Access the installation file provided via the shared link.
Launch the Installer: Double-click the downloaded file to initiate the installation process.
Follow the Installation Steps: Proceed through each step of the installation wizard by following the on-screen instructions.
Complete the Setup: Finalize the installation and ensure the program is successfully installed.
user Interface
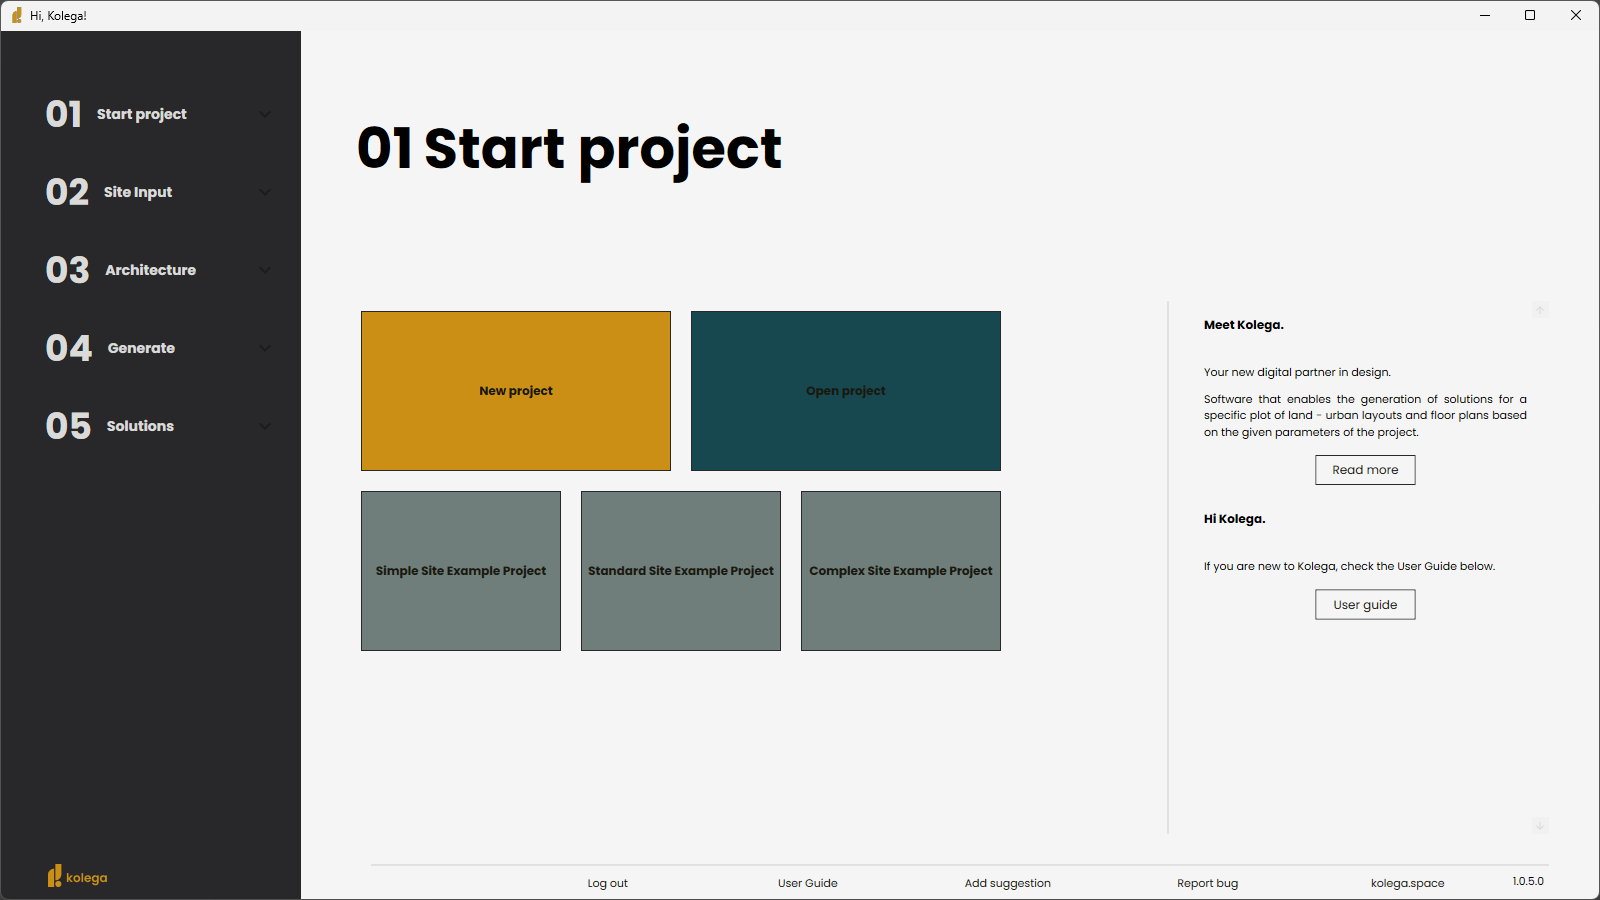
Navigation Panel:
Located on the left side of the main window, the navigation panel provides access to all workflow steps required to generate solutions. Each step is clearly outlined and sequentially organized for user guidance.
Main Canvas:
The central workspace displays geometric objects and visual elements. Users can interact with and manipulate these objects directly within this area.
Properties Panel:
Positioned adjacent to the main canvas, the properties panel allows users to view and modify attributes of selected geometric objects
navigation panel
The program is navigated using the navigation panel, located on the left side of the main window.
This panel contains all the steps users need to follow to generate the appropriate solutions.
01 Start Project
Create new project:
To start a new project, select the New Project tile from the Home screen.
You will be asked to enter a name for the project (this will also be used to name the project folder), a short description (optional) and location where to save the files. Once these details have been completed, the project will be created and Kolega will proceed to the Site Info screen.
Open existing project:
To open an existing project, select the "Open Project" option and navigate to the project folder in the dialog window. Make sure to open the folder itself (not just select or highlight it).
Open example project:
The program includes three sample projects, which are an excellent starting point for understanding how the software works. These examples vary in complexity.
The more complex the project, the more powerful the computer is required, and the longer it may take to process.
02 Site Input
In the Parameters column on the right side of the window, enter the parameter values for your investment. This information is necessary for the operation of Kolega.
site data:
Downtown
sunlight Settings:
Preset
Time zone
Time spans
Area Settings:
Flat area ratio
Pre-set or custom time requirements for daylight analysis (date, time and span).Note: Due to summer time changes in some time zones, Kolega is aware of daylight saving time.
Settings for time zone and minimum direct sunlight requirement.
Time zone where the plot is located.
To specify the time interval in which the minimum direct sunlight will be checked, you need to specify: the date, the minimum required number of hours and the time interval in which this will be analyzed.
You can add a few time periods to include in the calculation.
If several time spans are added, the minimum requirements will have to be met in all of them.
Failure to meet the requirements in one of the time slots means failure to provide minimum insolation.
Flats related settings on area calculation.
The area of the apartments, reduced by the walls and internal utility shafts.
Latitude, Longitude
Location on map
Location related settings with influence on simulations and building design.
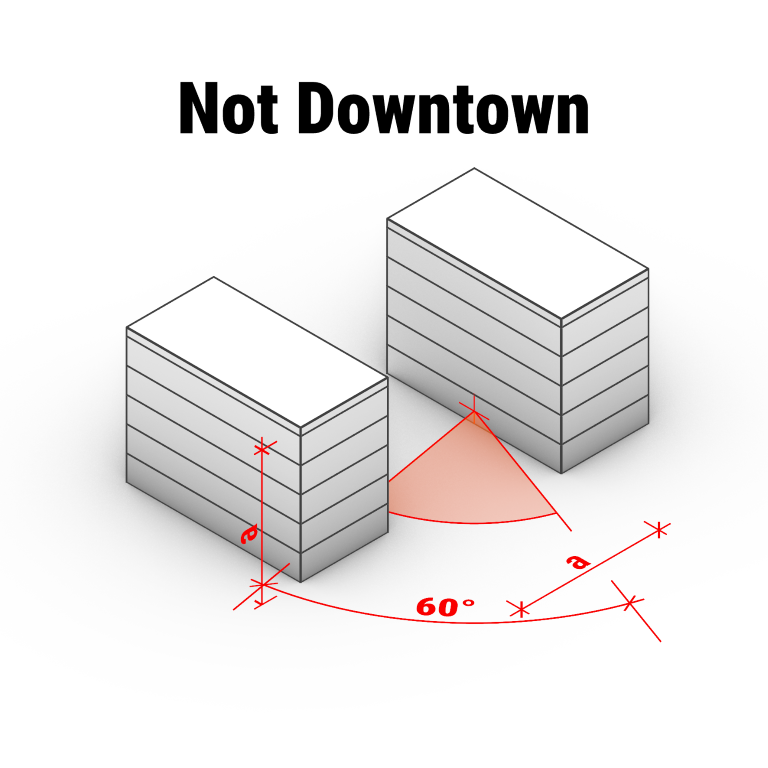
Is the investment located in the downtown area. The downtown area has less rigorous requirements for access to sky light.
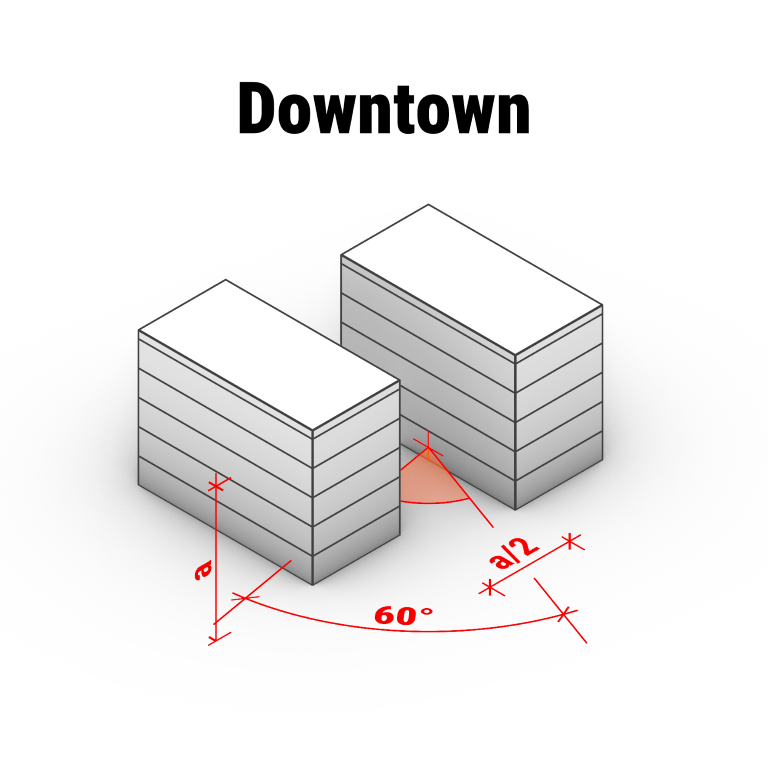
Enable the Downtown option when a ptoject is located in a dense urban center. Activating this option allows a wall with windows to be positioned at a distance equal to half the height of the opposite building. The height is measured from the window sill of the analyzed building to the highest point of the opposite building.
If this option is disabled, the minimum distance between a wall with windows and the neighboring building must be at least equal to the height of the opposite building.
These settings do not affect the calculation of direct sunlight. To determine the minimum duration of direct sunlight exposure, go to Sunlight Settings in “02 Site Input”.
Location of the plot. It is necessary to specify these values accurately because direct sunlight will be calculated based on this.
By clicking this button you can check on the map whether the entered longitude and latitude correspond to the selected plot.
03 architecture
importing project geometry from a dxf file
To manage the geometric data of the designed plot and its surroundings, an appropriate DXF file must be prepared. This file should be imported. The easiest way to prepare such a file is to edit the sample file.
You can read more about this in
04 generate
generative presets:
Kolega has three building generation modes:
Initial 256 generates solutions, displays 32
Standard 480 generates solutions, displays 48
Extended 640 generates solutions, displays 64
Development generation time may vary depending on the size of the plot and the complexity of the case.
start the analysis:
To start the process you have only to press “Start generating” button.
By clicking on the stop and save button, we can stop generation and move to the next step on the “05 Solutions” navigation bar.
05 Solution
By clicking the export button you can export the selected solution to popular CAD formats: DXF, BIM, OBJ.
After pressing this button, a folder with exported solutions will open.
system requirements
Operating System: Windows 10/11 (64-bit)
RAM: 16 GB or more recommeded
GPU: Support for OpenGL 3.1 or higher, minimum 8 GB VRAM
Screen Resolution: 1920x1080 or higher recomended
Disk Space: minimum 1GB for installation + additional space for projects